REPLACING FET's
FT-857/FT-897's EXCITER, FT-817's FINAL AMPLIFIER
By Kevin ON5DRE.

INTRODUCTION
A while ago, I bought a used and defective FT-857 transceiver, which had an intermittent transmit power problem. First thing I did was to check all BIAS settings of the different amplifier stages. All stages could be aligned properly according to the service manual. So, in my opinion, all stages should work properly. Still, while in transmit, the power was lost more and more often. Most logic end easy thing to do, was to decouple the power amplifier at the bottom with the red coax plug at the top. I then connected the output of the exciter stage via a power/SWR meter to a dummy load. In transmit, I saw that the signal was still intermittent there or gone.
SETUP
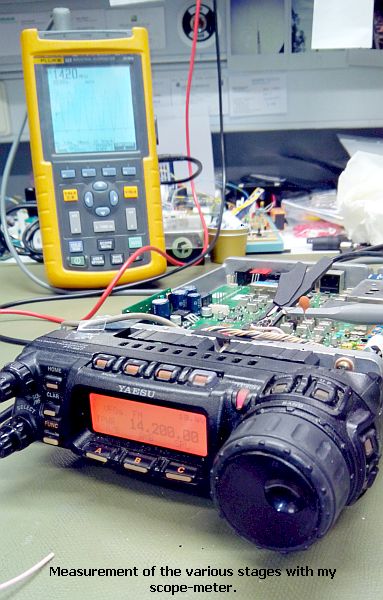
In this setup, I connected my scope-meter to the gate of the exciter FETs 2SK2975. There was also an intermittent signal. So I connected the scope-meter to the output of the next stage, the one with the 2SK2973 FETs. There the signal was stable.
While doing all these tests, all of a sudden, I got no more power anymore out of the exciter stage, not even intermittent. This was not good, so I re-checked the BIAS setting of the exciter, and I could not set the BIAS anymore. Here the real problem begins: I blew the exciter FETs…
Now I have real good confidence that the exciter stage is blown, I connected the output of the 2SK2973 FETs directly to the output of the exciter stage, disconnecting the exciter completely (unplug the jumper for BIAS measurement) At last some hope: I saw a stable signal at the output, and connected the the power amplifier at the bottom, this created about 20 W RF at 100 W setting.
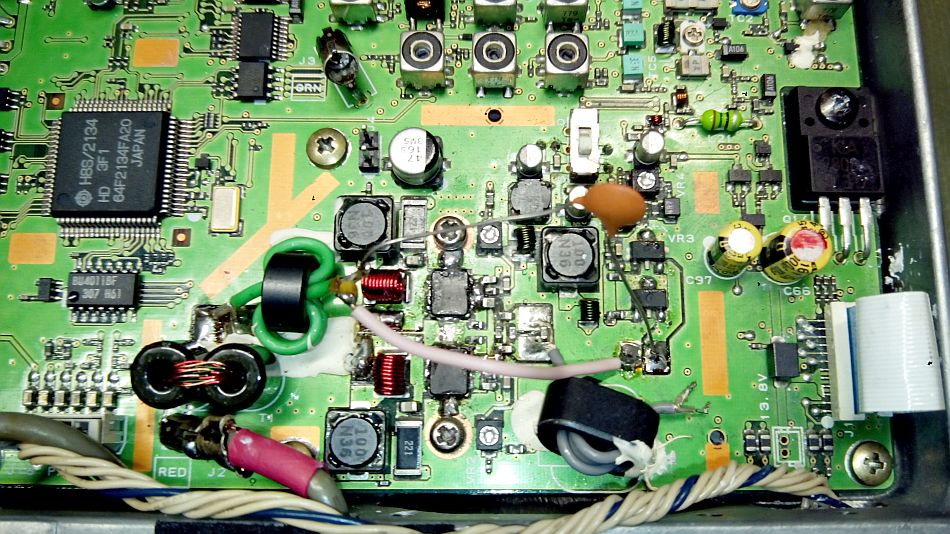
Bypassed exciter stage with white “ground” wire, and couple-capacitor. Note the unplugged jumper on top of the picture!
TO FIX THE PROBLEM
The problem is now definitely located in the exciter stage. I searched the web about this problem, and found various problems, in not only the FT-857, but also the FT-897, which is actually the same radio, and also the FT-817, who has the same FETs to make it’s 5W RF output. I also learned that I now was a member of the “blown finals club”. Yay ! But in my search on how to fix this problem, I did not come up with much useful information. My best option was to go the FT-817 way of fixing : buy a new final board, with the complete amplifier on it, and try to merge it somewhat into the FT-857.
|
installed. |
I did not like this option at all, because it would involve some serious cutting in the main PCB, to fit the cooling for the new FETs, they have to be bolted to the center casing for proper cooling. This is really my last resort. I learned via various sources (thanks, HAM community) that the RD07MVS1 is more rugged than the original 2SK2975, and even Yaesu uses them as their more recent finals in the FT-817. It was also stated in some forums that the RD07MVS1 is not a simple drop-in replacement FET. So I started to search for the Yaesu schematic with the updated FETs in it. Up to today, I never found it…, but I found some info in a Chinese forum, where a HAM describes the differences between the “old” FT-817 finals board, and the “new” board. The difference lies in the bias circuit, and another capacitor on the input circuit. Not much other things were changed. OK, so I ordered 4 new RD07MVS1 FETs online Yes 4 pieces… sh*t happens, you know… and while I was at it, a TXCO to fit the transceiver.
In the meantime, I was searching how to remove and replace those weird looking FETS, with no “pins” on them. The FETs are soldered at the bottom, not only to the PCB, but also to the cooling-block underneath them. To top it off, the cooling-block is also soldered to the PCB on the underside. My soldering iron crawls away slowly in shame… I need something with more power, so I can remove the cooling block. To work on these small, fragile SMD components, I used this big hot-air paint stripper, which blows air at 600°C !
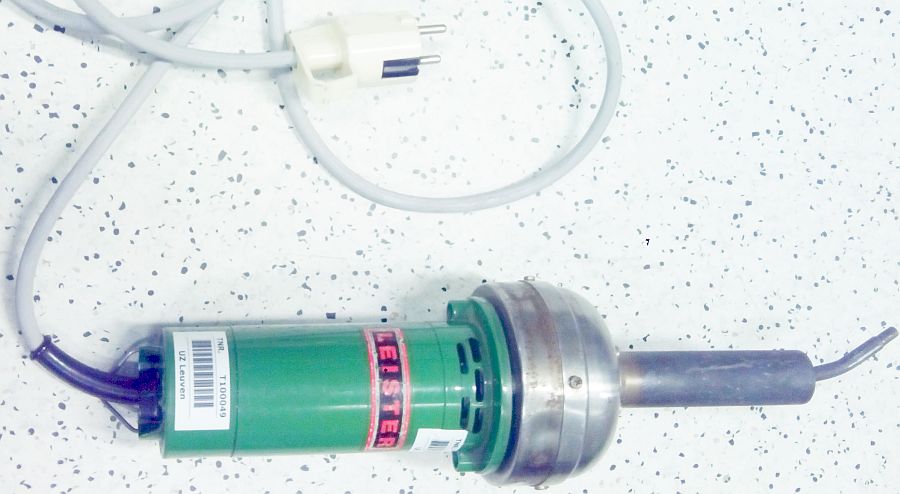
The used hot-air blower. Originally for floor-repairing and paint-stripping. Works great on small SMD rework ;-)
I used a fine nozzle, to concentrate the airflow onto the bottom of the cooling block. While heating, I gently pried with a small screwdriver under the cooling block. After about 10 seconds, the cooling block pops off.
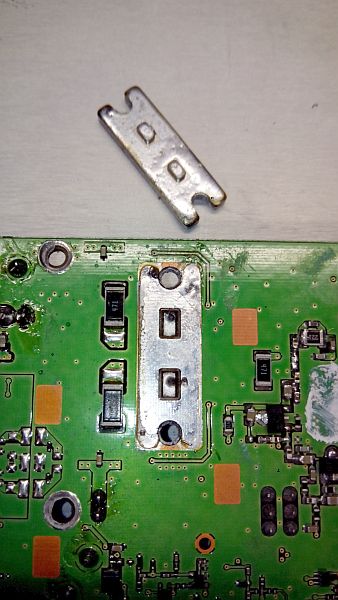
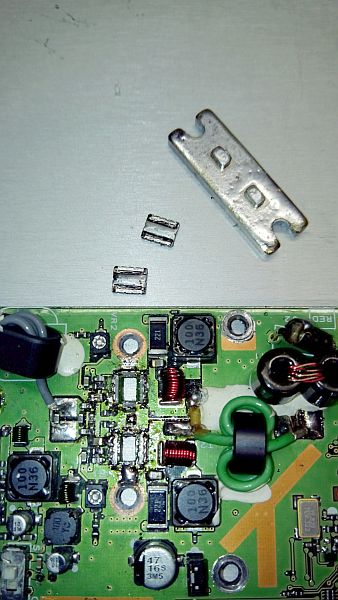
Cooling block removed, and after a few seconds, also the removed FET’s.
With the cooling block removed, you can easily remove the FETs with your soldering iron trough the bottom hole. Once removed, the PCB is cleaned with some solder-wick, to leave a clean board afterwards. Note that I also removed the 2 220 ohm resistors in between the 2 FETs. I did this for easier access to clean the PCB, and because the new BIAS circuit for the RD07MVS1 didn’t require them.
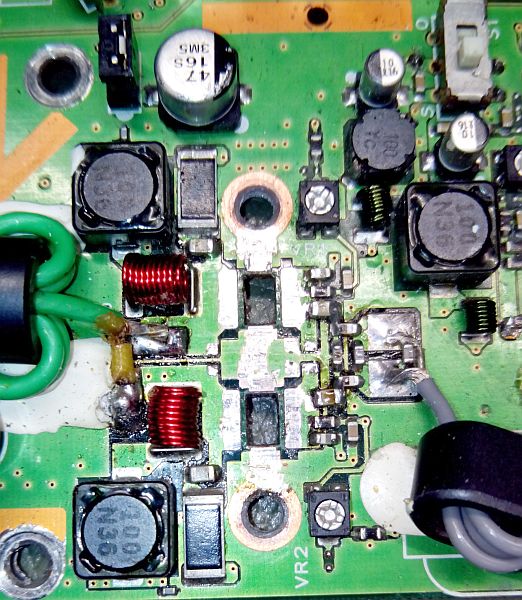
Clean board ! here, the 2 × 220 Ohm resistors in the middle of the FETs are removed.
INSTALL FET's
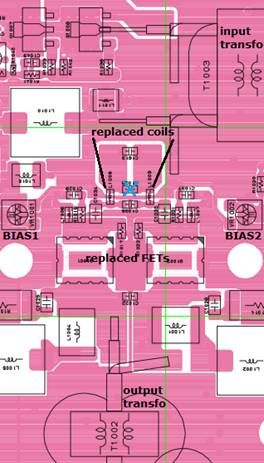
To put back the RD07MVS1 FETs, I simply placed them on the board with a fine pincet, and soldered all sides to the PCB. Now I turned the PCB upside down, put a little tin on the bottom of the FETs, and placed the cooling block on its place. As you will notice, because of the extra tin applied to the bottom of the FETs, this cooling block is not touching the bottom of the PCB. This is OK! Now heat up the cooling block again with the hot air blower. You will find that at some point, the block “drops” a bit, confirming that the extra tin on the bottom of the FETs has melted. Make sure that the holes of the cooling block are aligned with the holes in the PCB.
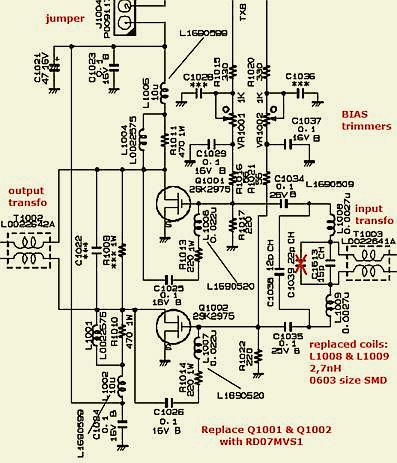
The difficult part is done now. As I stated above, I removed the 2 × 220 Ohm resistors of the Bias network. There was also the need of placing an extra 1K8 resistor “somewhere” behind the trimmers for setting the BIAS. I tried this setup, and without placing the jumper on the PCB, I measured the voltage on the gate of the FETs when I adjusted the BIAS. The lowest possible setting was 4.2V. This would result in a short-circuit!
So I rebuild the original BIAS circuit, WITH the 2 × 220 Ohm resistors in the middle of the FET’s, and now the voltage on the GATEs of the FETs can be reduced to about 1 V. According to the RD07MVS1 datasheet, the FET requires about 1.4 V to start conducting. SET BOTH TRIMMERS FULLY COUNTER CLOCK WISE NOW !
While soldering all around the input circuit of the FET’s I noticed that one of the SMD coils (coil L1009 in the schematic) had a “loose end”. It looked ok, but when I soldered it at one side, the complete coil came loose. Aha, the problem with the intermittent power loss is found. I ordered 10 new coils from Farnell (order code 1669603; 2,7 nH; 0603 size). Lucky me that I had to order them with a minimum of 10 pieces, The first coil I replaced fell apart. These coils are very fragile, so I carefully replaced both coil L1008 and L1009 with a new one and checked everything with my ohm meter. Everything makes good contact now.
In the original service manual, you can see in the schematic that at the input of the exciter stage, right after the toroid, there are 2 capacitors. One 15 pF, paralleled with one 22 pF. On the new FT-817 board with the RD07MVS1 FETs, there is only one capacitor of 15 pF. So I removed the 22 pF capacitor here.
This is in fact the ONLY change I made when replacing the original 2SK2975 FETs to the new RD07MVS1 FETs.
Best thing to do is test with your ohm meter for any possible shorts, then recalibrate the BIAS of your brand new RD07MVS1 FETs. I used 100 mA per FET, so a total of 200 mA. A bit high, but no problem. Connect everything correctly, make sure your bottom casing of your transceiver is placed and screwed tight, and do your first test.
I set my TRX to 14.200 MHz, power setting 50W, mode FM. You’ve got power? congrats! As of now, you are a member of the “Fixed finals club” ;-) hi !
TEST SEQUENCE
Test your TRX on various bands, and with various power levels. You will notice that the setting of power level may be a bit off to the power that the TRX is actually delivering (according to your PWR meter off course…). I had this “problem” too, and the thing to do is a recalibration in the service-menu of your transceiver.
I don’t know if I did my calibration correct, but it sure did work for me. Here is how I did it:
Connect your TRX via a power meter to a dummy load. Set menu 024: HF1-PO-MAX, set mode to FM. Push the PTT switch on your microphone and see what power you measure. Adjust the power to 100 W on your meter. Important: note the new value in the list you made earlier with all the settings. This MAY come in handy someday.
Repeat these steps for the other menu’s as well. Next we have menu 025: HF1-PO-MID2. Adjust the power till you measure 50 W. In menu 026: HF1-PO-MID1, adjust for 10 W on your meter. In menu 027: HF1-PO-MIN, adjust for 5 W.
All other steps are the same, just for other frequencies. Do all menus from 024 till 044.
In menu 043: UHF-PO-MAX I did not reach the stated 20 W (only about 14 W). Maybe my setup and power-meter? Anyways, it is not a great problem, so I adjusted to the maximum achievable power level, and kept the setting there.
This concludes the calibrations of the power levels. Test your reborn transceiver on the different bands, with various power levels, and hopefully it works as good for you as it did for me !
Best 73, Kevin ON5DRE.
![]()